1.Background on Style Sheets
 
This chapter explains what style sheets are and why they are effective for control of the layout

of your courses.

  1. 1.1 What are Style Sheets?
  2. 1.2 ReadyGo's implementation of Style Sheets:
  3. 1.3 Examples of courses using style sheets
  4. 1.4 Sources for more information
1.1 What are Style Sheets?

Style Sheets are templates, very similar to templates found in word processing applications, that tell a web page how to display.

Style sheets are a web standard for customizing and controlling the appearance of a web page, web site, or a group of web sites.

The benefit of deploying style sheets for e-Learning courses is you can point all your courses to one style sheet. You only need to change the style sheet to affect the look of all courses that point to that style sheet.


1.2 ReadyGo's implementation of Style Sheets:
ReadyGo has integrated style sheets into our products to provide course developers with maximum flexibility in customizing the look of a course.
>From the ReadyGo dialogs, the course author can choose the colors & graphics, default fonts, and frame layout. Now, with style sheets, the author can more precisely control the position, font, background color, etc. of each element type.

For example, if all bullet page titles need to have a dark-blue background, use a white arial font, and be right-aligned, this can be done from the style sheet.
ReadyGo has made an effort to maintain the existing (easy) user interface, but give advanced users access to these very powerful features.
ReadyGo's implementation of style sheets has been developed to work on 4.0+ browsers and to ensure all pages in a course display correctly. IE 6+, Netscape/Mozilla 6.2+, Opera browsers that have a more advanced techniques such as replacing graphics can be carried out through the style sheets. All the way to today's HTML5 CSS3 type browsers.

Course developers can use one of the provided ReadyGo style sheets, modify a ReadyGo style sheet, or have their graphic artists design a custom style sheet. For those organizations that have deployed a team of course developers using ReadyGo, all they need to do to ensure a consistent look throughout their courses is to point to a central style sheet (and use a consistent course setup) when creating courses.


1.3 Examples of courses using style sheets
This is the same simple course with a different template applied to it. Templates include color's and graphics and style sheets. You can mix and match colors and graphics and style sheets.

Page with link to ReadyGo Templates

1.4 Sources for more information

ReadyGo's web site:

Tutorial explains ReadyGo's implementation of Style Sheets

CSS Terms Cheat Sheet - provides a listing of the most commonly used CSS terms

Implement style sheets (tour takes 1 minute)

Links to web sources on style sheets:

Zen Garden

CSS Guide

The W3C site has lots of wonderful information:


1.4.1 1.4a Commonly used CSS terms
Commonly used CSS terms, a complete listing can be found on the W3C site (see link on Style Sheet page).


Properties


Values


Definition


border:


black solid; or gray 2pt outset;


attributes of border, Modifiers like outset (button),

inset (shadow),  ridge (raised), and double (double line) can be used

to define the border


border-width:


0 medium medium 0;


thickness of border,  can also use points (pt)

first number is top, second number is right side, third number is bottom,

forth number is left side


border-style:


solid;


color:


black; or red ...


identify color of text


display:


block;


text displays aligned


display:


none;


turns off attribute, attribute will not display


font-size:


100%;  or 12pt;


size of font


font-weight:


bold;


weight of font


font-style:;


arial; or italic; ...


style of font


list-style-type:


none;


turns off numberings, or defines numbering


list-style-image:


url("location for image")


turns off image, or defines image


margin-left:


10pt;


margin to the left of the element


margin-top:


10pt


margin to the top of the element


margin-bottom:


10pt;


margin to the button of the element


margin-right:


10pt


margin to the right of the element


margin:


20pt 0 20pt 0;


can also be used to create margin, first number is

top, second number is right side, third number is bottom, forth number is

left side


text-align:


left; or right; ...


to align text


text-decoration:


none;


will turn off features like underline


vertical-align:


top; or center; ...


to align text


width:


90%;


width of element on page


2.Style Sheet Basics
 
The basics of creating a ReadyGo course using style sheets

  1. 2.1 Getting Started
  2. 2.2 Enabling Style Sheets
  3. 2.3 Configuring Style Sheets
  4. 2.4 Choosing a Style Sheet
  5. 2.5 Editing the Style Sheet Components
  6. 2.6 Customizing Style Sheet Components
  7. 2.7 Style Sheet tags
  8. 2.8 Style Sheet Properties and Values
  9. 2.9 Fine-tuning your course
2.1 Getting Started
To develop a course using style sheets you should:

Create your course using the ReadyGo WCB

Identify all your colors, graphics, logo's, layout, and default fonts using the ReadyGo WCB.

Select a style sheet (or a series of component style sheets) for your course.

Generate the course, and fine-tune the elements controlled by the style sheet.

Tip For more information on using ReadyGo to change the look of a course you can

take the tour Changing

the Look of a Course (2 minute tour).

2.2 Enabling Style Sheets
Choose "style sheet" from the course wide property page or from the toolbar choose: customize>style sheets.


2.3 Configuring Style Sheets
The style sheet selection dialog gives you several options with respect to how the pages are coded and where the style sheet is located.
You can control how rigidly the pages are coded during generation.
Basic 3.X WCB Layout: When a course is built with this option, the HTML pages contain all the positioning tags (tables, etc.) that are used by WCB 3.2 and earlier. Use this option if you like the layout provided with earlier versions of WCB, but you just want some additional control over fonts and display of graphics.

ReadyGo has provided some style sheets that are tuned for the 3.x coding. Please use one these (e.g. "Classic3x") so that you get proper display of the existing elements.
All Layout Controlled by Style Sheet: With this option, there are fewer embedded HTML tags specifying the positioning of text and graphics. Instead, the code is set so that you can control the positioning through the style sheets. You have maximum flexibility with this option.

You can also select how the style sheet is used
No use of style sheet: This option is only available for the "Basic 3.X" layout. If this option is selected, courses will appear just as they would if generated with a pre-4.0 version of ReadyGo.

Local Style Sheet: Each course has its own style sheet that is stored as part of the course. ReadyGo recommends that this option be used during course generation so that the style sheet can be tailored to your needs.
Remote style Sheet: Once you have a style sheet that you are satisfied with, and you want to use this in multiple courses, publish your style sheet to a browsable location. Then, specify to your various courses that they should use the specific remote style sheet.

The purpose of the "remote style sheet" option is to provide you a central location from which you can quickly refine the layout of all your courses. If all courses point to the same style sheet, by just modifying that sheet, you will modify how all your courses appear the next time they are displayed.

2.4 Choosing a Style Sheet
ReadyGo has created sample style sheets that you can use as a starting point. You can select a style sheet for the entire course by using the "Select Style Sheet" button, or you can select individual component style sheets.
Choose one of the sample style sheets found in the css directory

When you select a full style sheet, ReadyGo breaks it down into component parts and loads these into the areas lower on the style sheet page.


2.5 Editing the Style Sheet Components
ReadyGo has broken the style sheet into sections based on the different page types found in a course. For example, all the properties for a bullet page elements (header, title, navigation buttons, bullet points, graphics, tip/true, links to sub-pages, footer) are grouped in the "bullet page" component.
The different course elements include: Main introductory page, chapter summary,

bullet page, sub pages, sidebar, services menu, and instruction page.
Styles common to all pages: This includes the default BODY properties (borders, font, etc.), navigation buttons (forward/back - enable/disable), course-wide images (you could turn off display of all images), TABLE (how dow tables appear), default settings for page titles and for text blocks.

Main/Introductory Pages: Display settings for course title, copyright, etc. that appear on the first page seen by the students.
Chapter Summary/Table of Contents: Control the display of the first page of every chapter from this component, including the table of contents automatically generated. (The course-wide table of contents is controlled in another area.)
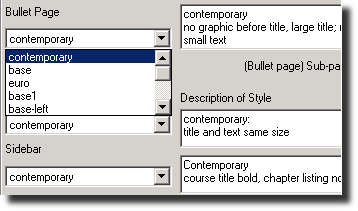
Bullet Page: All the properties for elements that appear on the bullet pages are available here. Note that there is also an ability to control whether links to sub-pages are aligned horizontally or vertically. The horizontal setting is typically used when the sub-page links are placed at the bottom of the bullet page. If you wish to place these links to the left or right of the bullet points, use the vertical setting.
Sub-Pages: This component contains the styles for TryThis, TellMeMore, StepByStep, Tests, Quizzes, and custom SubPages. The styles for tests generated by SST can also be set here.
Sidebar: Control of the graphics, chapter lists, and bookmarking buttons is available in this group. If you use an expanding tree menu, its properties can be fine-tuned here.
Service/Menu Bar and Services: Contains the styles for the services bar and for the help, FAQs, glossary, and course table-of-contents.
Instruction Page and Certificates
To edit one of these components, simply click the associated Edit button


It's True! You can mix and match elements. You can choose the introductory page from one style sheet and the sub page from a different style sheet.

2.6 Customizing Style Sheet Components
Once you choose edit, a dialog box will appear where you can edit that element of the style sheet.
The comment section allows you to provide a description of the characteristics of this style component. This is useful if you would like to reuse the customization with another course, and you want to quickly know what each style component contains.

The main styles can be edited directly in the lower area of the edit box. (More on how to change a style on the next page of this course.)
Once you have completed your modifications, you can "Save with Course" and/or "Save with other templates for sharing".

Saving with the course stores a copy of this customized component with this course. When you generate the course, the customized style will be applied to the course. It will be available to this course every time you open it.

You can also store the customized style component so that it is available to other courses. This means that the component name will appear in the pull-down list for that component on the main style sheet dialog.
If you keep the component name unchanged, and you save it with the course (only), on the main style sheet dialog you will have the option to "Use Shared Copy". This button lets you overwrite your customizations using the version that has been stored for sharing.
When you generate your course, all the customized components will be merged into a single style sheet for the course.

2.7 Style Sheet tags
When you enable style sheets with your ReadyGo course, every element has an associated tag. For example, the summary for every page is called the "summarydiv". When you modify the style for that element, it will carry over to all places where it appears. You can override that setting by specifying different styles for specific types of pages. For example, .main #summarydiv will apply to the summary only on the main page for the course.
This is what the style sheet looks like for the Main Page of the course:


.main #title {} /* course title */


.main #summarydiv{} /* surrounds course title */


.main #summaryspan{} /* course summary */


.main #coursename {} /* course name in copyright line */


.main #continue {} /*continue with course text*/


.main #copyright {} /* text in copyright line */


.main #fwdbtnbottom {} /*continue with course button*/


The basics of a style sheet tag include

Tag: main #title

Brackets for the property and value: { }

The comment, explaining the tag /* comment */

To make editing easier ReadyGo has included a explanation after each element name in the style sheet. If you are unsure of the name of a specific element, you can find out by generating the course, and then viewing the source code for the specific page where your text appears. The element is tagged using the HTML tags "SPAN" or "DIV". The name that appears after "CLASS=" or "ID=" is the identifier. For example, if your text is preceded by <SPAN ID="summaryspan">, you can control its style from the #summaryspan tag.

You will sometimes see labels in the style sheet preceded by a name that starts with a ".". An example is the style:


.main #title {}


The ".main" preceding "#title" indicates that changes to this title only affect it when it appears on a "main" page. The label for each page can be found by looking at the <BODY> tag in the source, and reviewing the value for "CLASS".

2.8 Style Sheet Properties and Values
Properties and values are used to control the look of a course.
Properties define what will be done to the page. For example "border", "color", or "font-size"

Values provide the details for the properties. For example if you want a title to display red you will enter the "color" property and set its value to "red"

You always include a colon between the property and the value, e.g: color:red

You may use multiple properties and values to modify a tag.

For example if you want the course title to be red, 30 points high, Arial font, and bold you would use the following series of properties and tags.


.main #title {color:red;font-size:30pt;font-style:arial;font-weight:bold} /* course title */


It's True! In chapter one of this course we provided links to a properties and values cheat sheet and to the W3C document which lists all properties and values

2.9 Fine-tuning your course
When you generate your course, ReadyGo creates a style sheet consisting of the default settings (e.g. Fonts, background colors, bullet images, etc.) as selected through the various dialogs, and consisting of the customized style components as selected from the StyleSheet dialog.

Every time you regenerate your course, the local style sheet is overwritten by ReadyGo.

The following approach will help you customize your style sheet if you are an advanced user:

First, generate your course.
Open a text editor like Notepad, and load the style sheet (.css) file that appears in the top directory of your generated course. (You can find out what that directory is by browsing your course, and looking at the location in the browser's address bar.)

When you view the stylesheet in NotePad each element (main page, chapter page, bullet page) is grouped together in the components seen on the Style Sheet dialog.

You can edit the style sheet and save it from Notepad. Then, reload your course (without generating). The changes you made to your style sheet should be visible in the browser.
The colors, graphics, and fonts chosen in the course through the ReadyGo dialogs are identified at the top of the page. For local style sheets you shouldn't edit this information from the style sheet since it will be overwritten when you regenerate the course.

Once you are happy with the style sheet, go back to ReadyGo, and from the StyleSheet dialog, press the "Select Style Sheet" button. Find the .css file you have been editing, and load it into the course. (The content auto-generated by ReadyGo based on the colors/frames/fonts dialogs will be ignored when the style sheet is reloaded.)

It's True! If you edit and save a style sheet outside of the course you will need to re-load it into the course

or else it will be written over.

3.Advanced issues with Style Sheets
 
There are varying levels of support for style sheets among the various browsers. Some of these issues, along with other "advanced" information are discussed in this chapter.
  1. 3.1 CSS Levels
  2. 3.2 Browser Support
  3. 3.3 Dynamically Changing the Style Sheet
  4. 3.4 ReadyGo Features
  5. 3.5 HTML5 and CSS3
3.1 CSS Levels
Style sheets are typically described as "CSS 1", "CSS 2" and CSS3. CSS level 1 is typically supported by the 4.x browsers. CSS 2 is supported by IE 6 and later and by Netscape/Mozilla 6.2 and later. The recent versions of the Opera browser have excellent support for CSS 2; CSS3 is supported by most modern 8.0 and later computer browsers; some SmartPhone and Tablet browsers.
CSS 1 consists of the main font, border, color, and other tags to control the display.
CSS 2 allows you to add content to your page. For example, if you want to place the text "bullet" before each bullet you can do so.
CSS 2 also allows you to specify behaviors like what should happen when the cursor "hovers" over the element.
CSS3 - includes features like: new color formats, gradients and boarders (i.e.. rounded boarders, shadow borders), multiple columns, text shadow...

Net Links
CSS2 Specification
3.2 Browser Support
Each browser type may interpret and display the styles slightly differently. Most styles are displayed pretty uniformly, but the following issues have been seen.
The borders look somewhat different between Microsoft, Chrome, Safari, and Firefox browsers. This is generally not a problem, but you should be aware of it.

It's True! ReadyGo spent significant effort playing with the different browsers to come up with implementations that worked uniformly.
Tip If you plan to publish your courses over the Internet, or if you know that your readers have lots of browsers, test your course using the different browsers!
3.3 Dynamically Changing the Style Sheet
At delivery time, you can change what style sheet is used by a ReadyGo course.

This is very useful if for example you have some students viewing the course from a desktop machine with a large (high resolution) monitor while others are viewing the course from a PDA.

To specify the style sheet at run time, add the following text to the end of the link to your course:


?css=your_css_file.css&iVert=0&


where "your_css_file.css" is the name of the style sheet file you want to use. The variable "iVert" controls whether the links to subpages on a bullet page appear vertically (iVert=1) or horizontally (iVert=0).
Dynamically specifying the style sheet allows you to adjust the layout and many of the colors/borders/fonts. You can change some of the stock images that are used in the style sheet if you use CSS 2, but this is not recommended.
ReadyGo has provided a style sheet named "blank.css" that just contains the identifiers for elements in the courses.

3.4 ReadyGo Features
Many options have been embedded into the courses produced by ReadyGo with style sheets controlling the layout.
All navigation images and stock images can be turned off (use "display:none;") in the tag for each element.
If you want to use text-based links for navigation, these can be enabled from the style sheet. Delete the "display:none;" value from tags whose name contains "alt", such as "fwdbtntopalt". The text that is used for these links is derived from the "Labels and Text" dialog.
In the style sheet dialog, under the "Bullet Page" component, you will see the option to use components named "left" and "right". These are set up to vertically align the subpage links on the bullet page and place them to the left or right of the bullet points.
You can copy/paste the style sheet settings between courses by right-clicking on the blue-book dialog in the ReadyGo tree view.

3.5 HTML5 and CSS3
We get lots of questions about HTML5 and CSS3
THe goal of HTML5 is to give people a multi media experience with out plug-ins.
HTML5 is the latest version of HTML. The big new feature for HTML5 is OVA and VAG. Audio and video native to the browsers.
Unfortunately a lot of people think that HTML5 means that any style sheet will work in a SmartPhone.
HTML5 and CSS3 gives you new features. It doesn't do anything to make sure that content displays properly in the different SmartPhones. Remember every SmartPhones needs two template versions - one that works in Portrait mode the other that works in Landscape mode.
ReadyGo has spent a HUGE amount of time assuring that all our "Touch" templates work in each of the different players in both portrait and landscape mode. There is nothing you need to do.

It's True! Ready Go completely supports HTML5 and CSS3

Cascading Style Sheets

Templates that control the display of a web page.

May also be called Style Sheets or CSS

Properties

Terms used to identify what will be done to a tag

Style Sheets

Templates that control the display of a web page.

May also be called Cascading Style Sheets or CSS

Tag

The words used to identify an element found on a web page

Values

Values modify properties

W3C

World Wide Web (W3) Consortium - an organization that defines standards for the WWW

    Contact/Help Information


    To sign up for a synchronous training course please contact ReadyGo

    ReadyGo Training