Graphic Basics
Learn the basics of creating web readable graphics
To view a printable version of this course, click here

Graphic BasicsCopyright
© 2006-2011 by
ReadyGo Inc. All rights reserved

| 1.1 Computer graphics |
 There are many types of graphic formats. Each format has been developed for specific reasons.
You can identify the file format by the two to four letter extension (letters after the . in the file name).
Not all graphic format types are readable by web browsers.
There are many types of graphic formats. Each format has been developed for specific reasons.
You can identify the file format by the two to four letter extension (letters after the . in the file name).
Not all graphic format types are readable by web browsers.
 Some graphic formats such as .eps or .ai have been developed to work with high resolution printers.
Other graphic formats will display on a computer screen but cannot be viewed in a browser e.g. .wpg or tiff.
Some graphic formats such as .eps or .ai have been developed to work with high resolution printers.
Other graphic formats will display on a computer screen but cannot be viewed in a browser e.g. .wpg or tiff.
| 1.2 Web graphic formats |
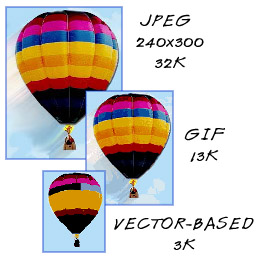
GIF - Graphics Interchange Format: A patented file format that supports 256 (8 bit) colors and is generally used for a wide range of graphics. GIF has three major features that make it popular.
Interlacing is a method of storing the image so that when it is displayed, it's quality is improved by several passes. The user gets an idea of the contents of the image before the entire image has been constructed. The images appears in several steps.
Transparency You can designate one color of the image as transparent. The text or images that are on the page beneath the GIF will be visible
Animation A sequence of GIFs, or portions of images, can be stored. The browser will then display these images in sequence, creating a moving image.
JPEG or JPG - Joint Photographic Experts Group: Is patent-free file format that supports 16 million (24 bit) color. It is generally used for high resolution graphics like photographs.
PNG - Portable Network Graphics: Provides a patent-free replacement for GIF. It supports many colors and is generally used for a wide range of graphics. The PNG format can also be used to save photographs.
Note: PNG support requires browsers later than 4.1.
 It's True! Higher numbers of colors and greater resolution for a file mean a better looking display, but also a larger the file size (so it will take longer to download.)
|
| 1.3 Choosing file formats for web graphics |
 Download speed is directly related to the size of the files that contain your images.
Therefore, try to keep graphics files as small as possible.
Reduce the resolution (dots per inch or dots per centimeter) at which you store
your images. By reducing your image from 120 dpi to 60 dpi, your file size will reduce to one-quarter its original size.
Use fewer colors, especially with manually created illustrations. You will usually have the choice of saving a file as a 16-color, 256-color, or 24-bit (16,777,216-color)
image. Look at your image after saving it with fewer colors. Your users will probably
not notice the difference, but your graphic will download faster.
Enter the size of your graphic in the WIDTH and HEIGHT attributes dialog box. This will speed up the display of your images because the browser will know how to lay out the page before downloading the file.
Download speed is directly related to the size of the files that contain your images.
Therefore, try to keep graphics files as small as possible.
Reduce the resolution (dots per inch or dots per centimeter) at which you store
your images. By reducing your image from 120 dpi to 60 dpi, your file size will reduce to one-quarter its original size.
Use fewer colors, especially with manually created illustrations. You will usually have the choice of saving a file as a 16-color, 256-color, or 24-bit (16,777,216-color)
image. Look at your image after saving it with fewer colors. Your users will probably
not notice the difference, but your graphic will download faster.
Enter the size of your graphic in the WIDTH and HEIGHT attributes dialog box. This will speed up the display of your images because the browser will know how to lay out the page before downloading the file.
|
It's True! The smaller the graphic, the faster the graphic downloads. Many times by lowering the number of colors you can dramatically decrease the size of the graphic.
|
| 2.1 Paint Shop Pro |
To get started, go to the Corel web site to download Paint Shop Pro.
You will need to install the Paint Shop Pro software on your PC.
|
It's True! It will take about 10 minutes to download and install Paint Shop Pro.
|
| 2.2 Bringing in a graphic |
Start up Paint Shop Pro from the icon on your desktop.
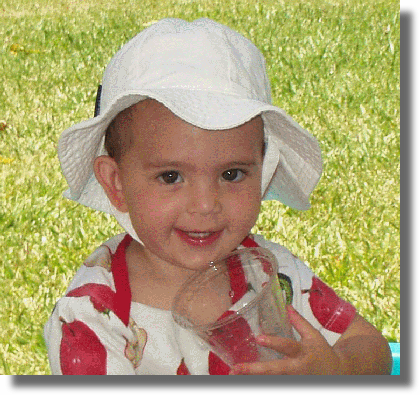
For this exercise we will use the picture below.
 For Microsoft Internet Explorer users, right-click the picture, choose save picture as and save the picture in your temp folder.
For Netscape users, right-click the picture, choose save image as and save the picture in your temp folder.
From the toolbar choose File > Open.
For Microsoft Internet Explorer users, right-click the picture, choose save picture as and save the picture in your temp folder.
For Netscape users, right-click the picture, choose save image as and save the picture in your temp folder.
From the toolbar choose File > Open.
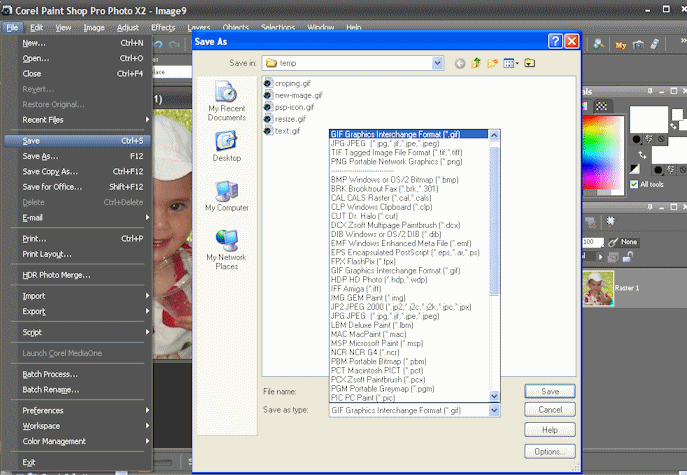
| 2.3 Saving a graphic |
From the toolbar, choose File > Save.
In the Save as Type menu, choose the file type for the graphic.
For web viewable graphics choose either GIF, PNG, or JPEG.
 Tip Keep track of the file name and location of your graphic so you can find it when you want to load into ReadyGo Web Course Builder.
|
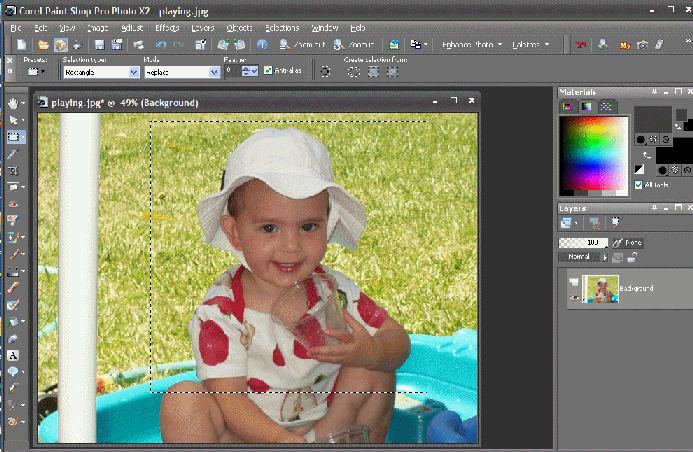
| 2.4 Cropping a graphic |
Click the selection tool located on the left toolbar (highlighted in green).
Drag your mouse over the section of the graphic you want to keep. Your selection will now be highlighted with a black and white dashed box.
Choose copy, then paste. The selection will now be a new graphic.
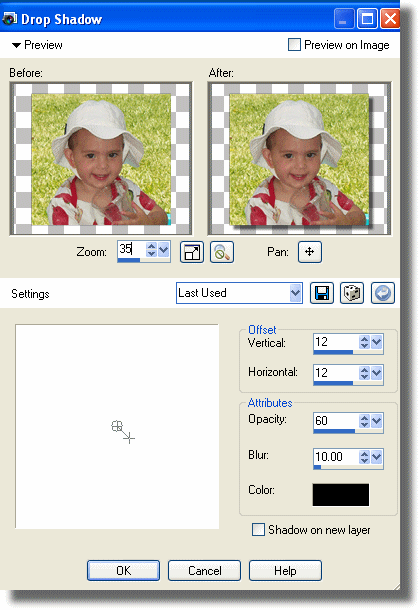
| 2.5 Resizing a graphic |
The first way is to make the photograph smaller.
From the toolbar, choose Image > Resize.
In the resize dialog, box click percentage of original and type 50%.
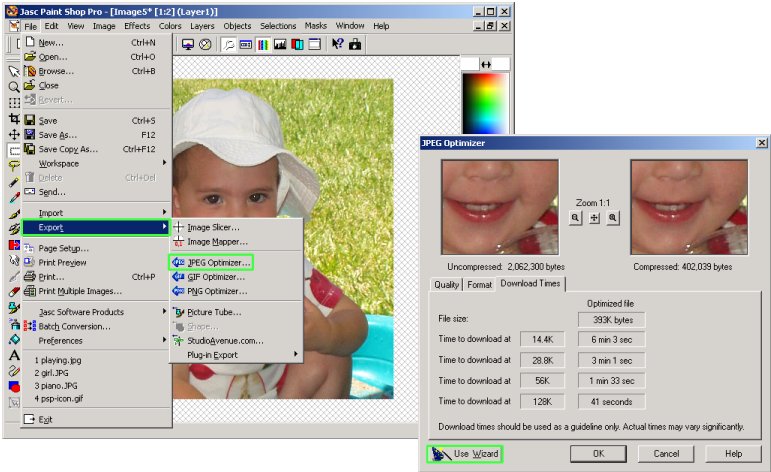
 The second method is for photographs that you don't want to shrink but you just want to optimize. Most tools have a way to optimize for the web.
From the toolbar, choose File > Export > JPEG optimizer.
In the JPEG optimizer, click the Use Wizard button.
The second method is for photographs that you don't want to shrink but you just want to optimize. Most tools have a way to optimize for the web.
From the toolbar, choose File > Export > JPEG optimizer.
In the JPEG optimizer, click the Use Wizard button.
| 2.6 Capturing a graphic |
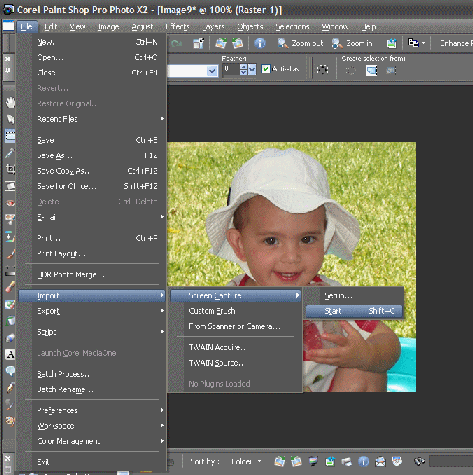 From the toolbar, choose File > Import > Screen Capture > Start.
Fill your window with the information you want to capture.
Right-click your mouse to turn screen capture on.
Use your left mouse button to drag and drop the cursor over the screen capture area.
You can now crop and if necessary resize the screen capture.
From the toolbar, choose File > Import > Screen Capture > Start.
Fill your window with the information you want to capture.
Right-click your mouse to turn screen capture on.
Use your left mouse button to drag and drop the cursor over the screen capture area.
You can now crop and if necessary resize the screen capture.
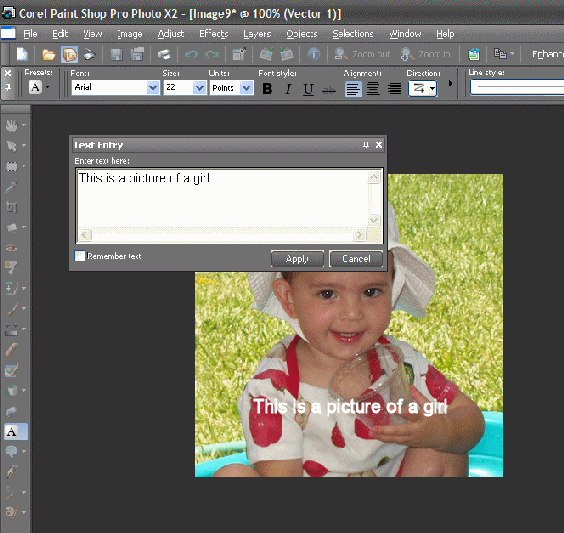
| 2.7 Adding text to a graphic |
On the left toolbar, click A (highlighted in green)
Click on the picture and the text dialog box opens.
Enter the words you want to display.
Click OK on the bottom of the dialog box.
|
It's True! Power Point has a great text and arrow tool. You can add your text and arrows in PowerPoint and then screen snap shot the picture into PaintShopPro.
|
| 3.Adding graphics to ReadyGo WCB |
| 3.1 Adding graphics |
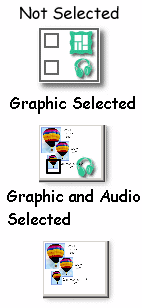 You can add graphics to a bullet page by clicking the Graphic/Audio button.
You can also add graphics to the front page and side bar, Tell Me More, Try This, and Step-by-Step pages.
Using the Graphic/Audio button you can easily integrate the following into your course: graphics, audio files, simulations, plug-ins, Java applications, or any other web tool.
You can add graphics to a bullet page by clicking the Graphic/Audio button.
You can also add graphics to the front page and side bar, Tell Me More, Try This, and Step-by-Step pages.
Using the Graphic/Audio button you can easily integrate the following into your course: graphics, audio files, simulations, plug-ins, Java applications, or any other web tool.
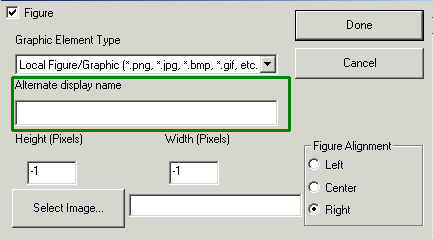
| 3.1.1 3.1a About the Graphic Element Type field |
Local Figure/Graphic (*.gif, *jpeg, *png, etc.) - You can add any graphic that a browser can display into your course. Select this option when the graphic is on your hard drive or a hard drive on a local area network (LAN) that you can access.
Remote Graphic - Use this option when the graphic is on a different web site. This graphic is not integrated directly into the course. The student must have Internet access to the location to see the graphic. An example of a remote graphic is a stock ticker located on a financial site. In this example, since the graphic is constantly changing, it is best to leave it as a remote graphic.
Java Applet - A Java Applet is a program that can run on a student's browser. Use this option to integrate simulations into your course.
Plug-In (embed) - Voice, video, and many graphics need a plug-in to work. You can integrate any content requiring a plug-in when you choose this option.
Local Image + URL - This feature turns a local graphic into a "hot" or linked graphic. When a student clicks on a linked graphic, a new web page or web site is displayed in a separate browser window. This keeps the class sticky by leaving the current page displayed in a window. The student accesses a new location in a new browser window.
Advanced/Other (Enter/HTML) - Use this option to integrate anything that runs on the web such as any HTML or JavaScript.
| 3.1.2 3.1b Adding Graphics and Audio |
| Step | Instruction | What it looks like |
|---|---|---|
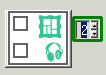
| 1 | Click the Graphic/Audio button. |
 |
| 2 | In the Graphic Element Type field, specify the type of media you want to integrate into the course. |
 |
| 3 | In the Alternate display name field, specify text that is displayed when the student moves the mouse over the graphic in the course. |
 |
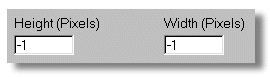
| 4 | Specify the size of your graphic. The default height of -1 and width of -1 allows the browser to display the graphic in its default size. |
 |
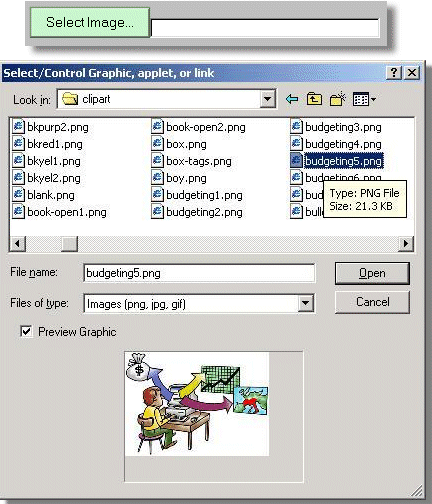
| 5 | Click Select Image to find the graphic on your computer. Select the graphic you want to use and click Open.
To see a preview of the graphic you selected, select Preview Graphic. |
 |
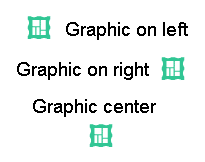
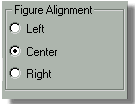
| 6 | Specify how you want the graphic placed on the page. |
 |
| 7 | To add an audio file to the page, select the Audio check box. |
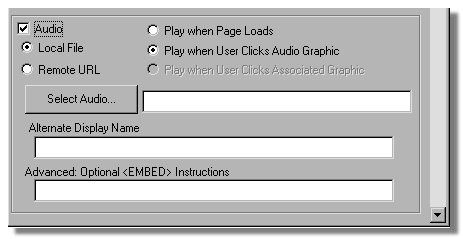 |
| 8 | Select whether the audio file is a local file or is located remotely where you will provide a URL for the file. |
 |
| 9 | Choose how you want the audio file to play on the page. |
 |
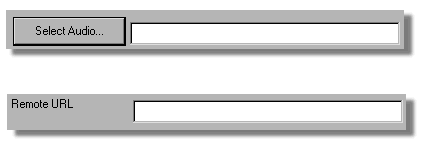
| 10 | If you selected to insert a local audio file, click Select Audio to find the file on your computer. Select the file you want to use and click Open.
If you selected to insert a remote audio file, enter the Remote URL. |
 |
| 11 | If you selected Play when User Clicks Audio Graphic, you can specify text that is displayed when the student moves the mouse over the audio graphic in the Alternate Display Name field. |
 |
| 12 | Add any additional options that may be required for the plug-in in the Advanced Optional Instructions field. |
 |
| 13 | Click Done to save your changes. |
 |
| 3.2 Moving MS clip art files into a ReadyGo WCB course |
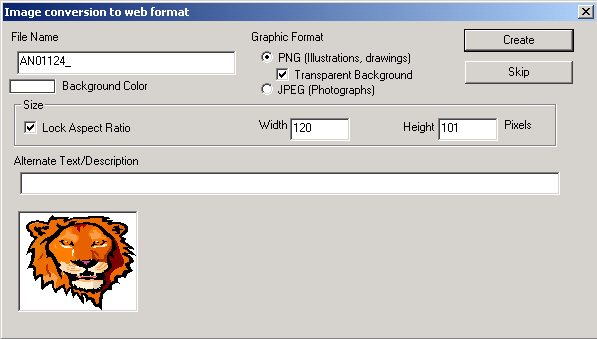
Click the Graphic/Audio button and navigate to your clip art file.
View and choose the WMF file you want to use in your course.
Click Create to save the file as PNG or JPEG.
| 3.3 Estimating a graphics height and width |
An optimal size of a logo located in the upper left corner of your browser is 50 x 50 pixels
An optimal size for a graphic located on a bullet page with bullet points to the left or right is between 250 x 250 pixels to no larger than 400 x 400 pixels.
An optimal size of a graphic located on a bullet page without bullet points is 400 x 400 pixels to no larger than 600 x 600pixels.
Flash files are usually larger then graphic files.
The optimal size for Power Point to flash is 600 x 480.
An optimal size for a screen shot simulation is 600 x 600.
| 3.4 Creating relative size graphics |
An absolute sized graphic is always the same size regardless the size of the student's browser.
A relative sized graphic scales depending on the size of the student's browser.
Sizing graphics:
To size an absolute graphic use either a -1 or the actual size of the graphic in the hight width section of the graphic dialog.
To size a relative graphic use a % in the hight width section of the graphic dialog. For example, make width 75%, keep height -1 so the picture scales correctly.
This picture is sized with a width and height of 75% . Make your browser window smaller or larger and watch this graphic shrink and grow.
|
It's True! This feature works much better in Mozilla browsers then in IE.
|
|
Tip Relative size graphics are good to use when you have a high resolution monitor and you don't know what type of monitors your student may use.
|
| 3.7 Graphics and blind readers |
The Alternate display name (Alt tag) is provided so that you can enter explanatory text
Since a blind person can't see the graphic, you will need to provide an explanation of the graphic.
|
It's True! It is good web etiquette to use the Alt tag.
|